
IMAP to Office 365 migration can feel daunting, but with the proper guidance, it doesn’t have to be. In an era where businesses are increasingly shifting to cloud-based services like Office 365, migrating your email data from an IMAP server is necessary to maintain effective communication within your organization.
This comprehensive guide aims to demystify the process of migrating from an IMAP server to Office 365, ensuring a smooth transition with minimal disruption.
Whether you’re migrating from Google Workspace (G Suite), Zimbra, Kerio Connect, or another IMAP server, we provide a step-by-step approach, practical tips, and insights to ensure a successful migration.
We’ll cover everything from preparation to execution and post-migration cleanup. You’ll learn how to transfer your emails and prepare your source, target servers, and your users for the migration.
Guide to Setting up IMAP to Office 365 for Migration
This guide will walk you through setting up Internet Message Access Protocol (IMAP) for Office 365 in preparation for a migration. IMAP protocol allows email clients to retrieve messages from a mail server. By configuring IMAP settings, you can ensure a smooth and seamless migration of your emails to Office 365.
Whether moving from another email service or upgrading from a previous version of Office, this guide will provide step-by-step instructions. We’ll cover every aspect of the process, from enabling IMAP on your current email service to configuring the correct settings in Office 365, so you can have confidence in your migration.
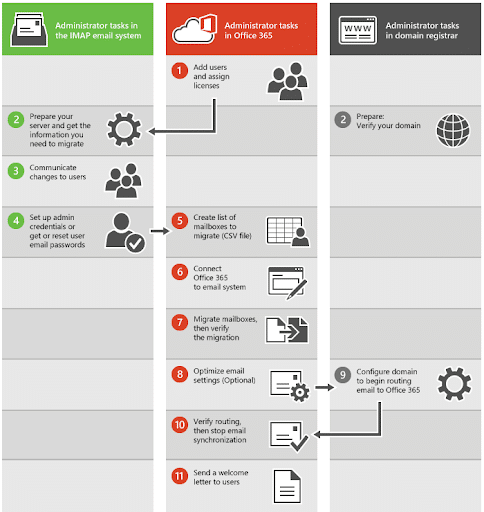
Step 1: Pre-Migration Assessment and Preparation
- Identify the source IMAP server (e.g., Gmail, Yahoo, custom IMAP server) and gather all necessary login credentials for each email account that needs to be migrated.
- Determine the amount of data to be migrated for each mailbox. This will help you estimate the time required for the migration.
- Check the data for any possible issues (like size and format of attachments, folder structure, etc.) that might affect the migration.
- Prepare Office 365 environment: Create users and assign them licenses. Their usernames should match the email addresses from the IMAP server to make the migration smoother.
- Ensure that your network bandwidth can handle the migration, especially if you plan to migrate a lot of data simultaneously.
Step 2: Setting Up Office 365
- Create Users in Office 365 and Assign Licenses
- Go to the Microsoft 365 admin center, add users individually or in bulk, and assign them the necessary licenses.
- For each user, ensure the primary email address matches the one on the IMAP server. This will allow the emails to migrate correctly.
- Configure Exchange Online
- Go to the Exchange Admin Center by selecting “Exchange” under “Admin Centers” in the Microsoft 365 admin center.
- Here, you can configure migration endpoints, which are settings that point to the IMAP server. This is needed for Exchange Online to connect and pull data from the IMAP server.
- Setup IMAP Migration Endpoint
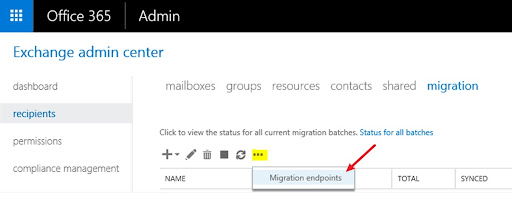
- In the Exchange Admin Center, under “Recipients” > “Migration,” click on “More” (…) > “Migration endpoints.”
- Click on “+” to add a new endpoint, select “IMAP,” and enter the IMAP server’s settings.

Step 3: Configuring the Migration Endpoint
- Go to the Exchange Admin Center
- Sign in to Microsoft 365 using your admin account.
- Select “Admin” from the app launcher (or directly visit the Microsoft 365 admin center), and then go to “Exchange” under “Admin Centers.”
- Navigate to the Migration Dashboard
- In the Exchange Admin Center, go to “Recipients” on the left, then the “Migration” tab.
- Create a New Migration Endpoint
- Click on “More” (…) at the top of the page, then select “Migration endpoints.”
- Click on the “+” sign on the new page to add a new endpoint.
- Select “IMAP” to configure an IMAP migration endpoint.
- Enter the IMAP Server Settings
You’ll be prompted to enter details about your IMAP server, including:
- The IMAP server’s fully qualified domain name (FQDN) or IP address. For Gmail, this would be “imap.gmail.com.”
- The port through which the IMAP server connects. The standard IMAP port is 143, and the standard IMAP SSL port is 993.
- Whether to use SSL to connect to the IMAP server. Most servers will require an SSL connection.
- After you input the settings, click “Next.”
- Confirm the Endpoint Settings
- Exchange Online will then test the connection to the IMAP server. If the test is successful, you’ll see the configuration summary of the migration endpoint.
- Click “New” to create the migration endpoint.
- Final Check
- Once the endpoint is created, it should be visible in the migration endpoint dashboard in the Exchange Admin Center. Confirm that it appears with the correct settings.

Step 4: Initiating the Migration
- Go to the Exchange Admin Center
- Sign in to Microsoft 365 using your admin account.
- Select “Admin” from the app launcher (or directly visit the Microsoft 365 admin center), and then go to “Exchange” under “Admin Centers.”
- Navigate to the Migration Dashboard
- In the Exchange Admin Center, go to “Recipients” on the left, then the “Migration” tab.
- Start a New Migration Batch
- Click on “+” and select “Migrate to Exchange Online” from the dropdown menu.
- Choose “IMAP migration” and click “Next.”
- Select Users
- On the “Select the users” page, click “Browse” to locate and upload a CSV file that lists the mailboxes you want to migrate.
- The CSV file must contain an EmailAddress column that lists the email addresses of the mailboxes to be migrated. If the IMAP server requires it, the CSV can contain columns for Username and Password.
- After you’ve uploaded and verified the CSV file, click “Next.”
- Configure IMAP
- Confirm that the IMAP server settings match the source email system.
- Then, click “Next”.
- Set the Migration Settings
- Name your migration batch, and choose the migration endpoint you’ve already set up.
- You also have the option to select the target delivery domain for the mailboxes that are being migrated. This is the domain where Microsoft 365 will route emails during the migration.
- Start the Migration
- Choose whether to start the migration batch automatically or to start it later manually.
- Click “New” to create the migration batch.

Step 5: Post-Migration Tasks
- Verify Migration
- Confirm that all email data has been successfully migrated to the new mailboxes. This could include checking several folders, such as the inbox, sent items, and any custom folders.
- Resolve any Issues
- Address any issues or errors that may have occurred during the migration. These might be visible in the migration dashboard in the Exchange Admin Center. Some common issues include exceeding mailbox quotas or encountering items too large to migrate.
- Reconfigure Mail Clients
- Users must reconfigure their email clients (like Outlook, Apple Mail, or mobile email apps) to connect to their new Microsoft 365 mailbox instead of the old IMAP server. Instructions for this can be found in Microsoft’s documentation or within the help resources of the specific email client.
- Import any PST files.
- If users have PST (outlook data files) that weren’t included in the migration, they may need to import them into their new mailbox.
- Update MX Records
- To ensure that all new emails go to the Microsoft 365 mailboxes instead of the old IMAP server, you’ll need to update your domain’s MX (Mail Exchange) records. These changes take up to 72 hours to propagate throughout the internet, so plan accordingly.
- Decommission Old Mailboxes
- After you’ve confirmed that all necessary data has been migrated and all new emails are going to the new mailboxes, you can start decommissioning the old IMAP mailboxes.
- Train Users
- Inform and train your users to access their email, contacts, and calendar items in Microsoft 365. This might include using Outlook, the online web app, or mobile apps.
Step 6: Decommissioning the Old IMAP Server
- Ensure a Complete Migration
- Verify that all data (including emails, contacts, calendar items, and tasks) has been successfully migrated from the IMAP server to Microsoft 365. It’s critical to double-check this before decommissioning to avoid any data loss.
- Reconfigure DNS Records
- Ensure all DNS records (MX, CNAME, SPF, etc.) correctly point to the Microsoft 365 services and no longer reference the old IMAP server. Note that DNS changes may take up to 72 hours to propagate.
- Disconnect Mail Clients
- Ensure all user email clients are disconnected from the old IMAP server and successfully connected to Microsoft 365.
- Backup and Archive
- Create a final backup of the IMAP server data for archiving purposes, adhering to your organization’s data retention policies and regulations.
- Shutdown Process
- Begin the shutdown process of the IMAP server. This process may vary depending on the server and its operating environment.
- Monitor for Issues
- Keep an eye on the mail flow and monitor for any delivery issues or user-reported problems in the days following the decommissioning.
- Delete or Repurpose Server
- Once you’re confident everything is working with Microsoft 365, you can delete the old mailboxes and data from the IMAP server. If the server resources are owned (not rented or cloud-based), you can repurpose or decommission the server hardware.
- Documentation
- Update any network, server, or IT documentation to reflect the changes made during the migration. Record any issues encountered during the migration and their solutions for future reference.
Benefits of Migrating from IMAP to Office 365
Migrating from an IMAP server to Microsoft 365 offers a range of benefits that can significantly enhance an organization’s productivity, collaboration, and overall efficiency.
Here are a few key benefits:
| IMAP Server | Microsoft 365 |
| IMAP servers generally only synchronize email, not calendar items or contacts. | Microsoft 365 synchronizes all data: email, calendar items, contacts, tasks, and notes. |
| IMAP servers may have limited storage space, depending on the provider. | Microsoft 365 provides ample mailbox storage per user (50GB standard and up to 100GB with an E5 plan, as of my last training data in 2021). |
| IMAP doesn’t include productivity software. | Microsoft 365 includes access to the Office suite (Word, Excel, PowerPoint, etc.), plus other tools like SharePoint, Teams, and OneDrive. |
| IMAP may not support advanced email features like folder creation and email flagging on all devices. | Microsoft 365 supports advanced email features across all devices. |
| Security features depend on the specific IMAP provider. | Microsoft 365 includes robust security features, such as Advanced Threat Protection, data loss prevention, and more. |
| IMAP servers have varying levels of support and might charge extra for premium support. | Microsoft 365 provides 24/7 professional support from Microsoft. |
| Backing up data might require third-party solutions. | Microsoft 365 has built-in options for data backup and recovery. |

Understanding the Different Options for IMAP to Office 365 Migration
When migrating from an IMAP server to Microsoft 365, several options are available, each offering its own features and capabilities to fit different needs and circumstances.
Manual Method Using Outlook Application
One manual method of migrating from an IMAP server to Microsoft 365 involves using the Outlook application. Here’s a basic overview of that process:
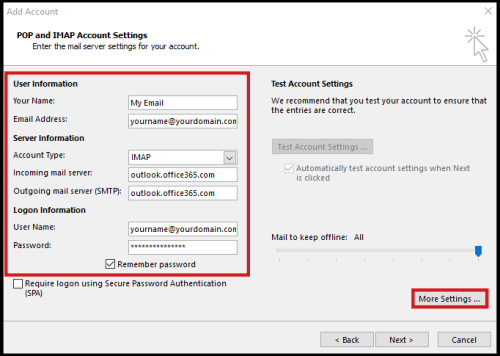
- Setup IMAP Account in Outlook: Add the IMAP account to an Outlook client. This requires the IMAP email system’s server details and credentials for the migrated account.
- Sync Data: Outlook will sync the IMAP account’s data (typically just email) locally once added. The length of this sync depends on the size of the mailbox.
- Add Office 365 Account to Outlook: Set up the Microsoft 365 account within the same Outlook client. You’ll need the user’s Microsoft 365 credentials for this.
- Manual Copy or Move: Once both accounts are set up and fully synchronized in Outlook, you can manually move or copy the emails (and other data if available) from the IMAP account to the Microsoft 365 account. This can be done by selecting all items in a folder and dragging them to the equivalent folder in the Microsoft 365 account or using the ‘Move’ command in Outlook.
- Sync to Server: After moving or copying the emails, the Microsoft 365 account in Outlook will sync this data back to the server.
- Repeat for All Mailboxes: This process must be repeated for each mailbox.
Third-Party Migration Tool with Trial Version or Demo Edition
Using a third-party migration tool with a trial version or demo edition can be particularly advantageous, and here’s why:
- Ease of Use: Most third-party migration tools are designed with user-friendly interfaces that simplify the migration process. This allows users with varying levels of technical expertise to conduct migrations successfully.
- Flexibility: These tools often provide a wide range of customizable options, allowing you to specify how data is migrated to fit your organization’s unique needs.
- Efficiency: Third-party migration tools are generally built to handle large volumes of data, making them much faster and more efficient than manual migration methods.
- Safety and Security: These tools typically offer built-in security measures to protect your data during migration. This can include encryption during transfer to ensure your data remains private.
- Free Trials or Demo Editions: Many third-party migration tools offer free trial versions or demo editions. This allows you to test out the tool before purchasing it, giving you an understanding of how it works and if it fits your needs.
Support: Companies offering third-party migration tools usually provide technical support to assist with any challenges encountered during the migration process.
How EPC Group Can Ensure a Smooth and Successful Microsoft Office 365 Migration
We are a trusted name in technology solutions, known for ensuring smooth and successful migrations to Microsoft Office 365. Our highly skilled professionals leverage years of experience and in-depth knowledge to guide businesses through the migration process.
We begin by understanding your unique requirements and IT environment, then formulate a customized migration strategy that mitigates risks, reduces downtime, and ensures data integrity. Our meticulous planning and execution and state-of-the-art migration tools ensure your move from an IMAP server to Office 365 is smooth and efficient.
The benefits of partnering with us for your Office 365 migration are manifold. We facilitate a seamless transition and provide post-migration support to help your team harness the full potential of Microsoft 365.
We take pride in our customer-centric approach and dedication to delivering value, aiming to transform your IT infrastructure into a strategic asset that supports growth and innovation. Contact us today, and let’s embark on your successful migration journey to Office 365.
Check out our step-by-step guides on how to perform Gmail to Office 365 and Exchange to Office 365 migration, or contact our experts to ensure a secure and seamless transition.